
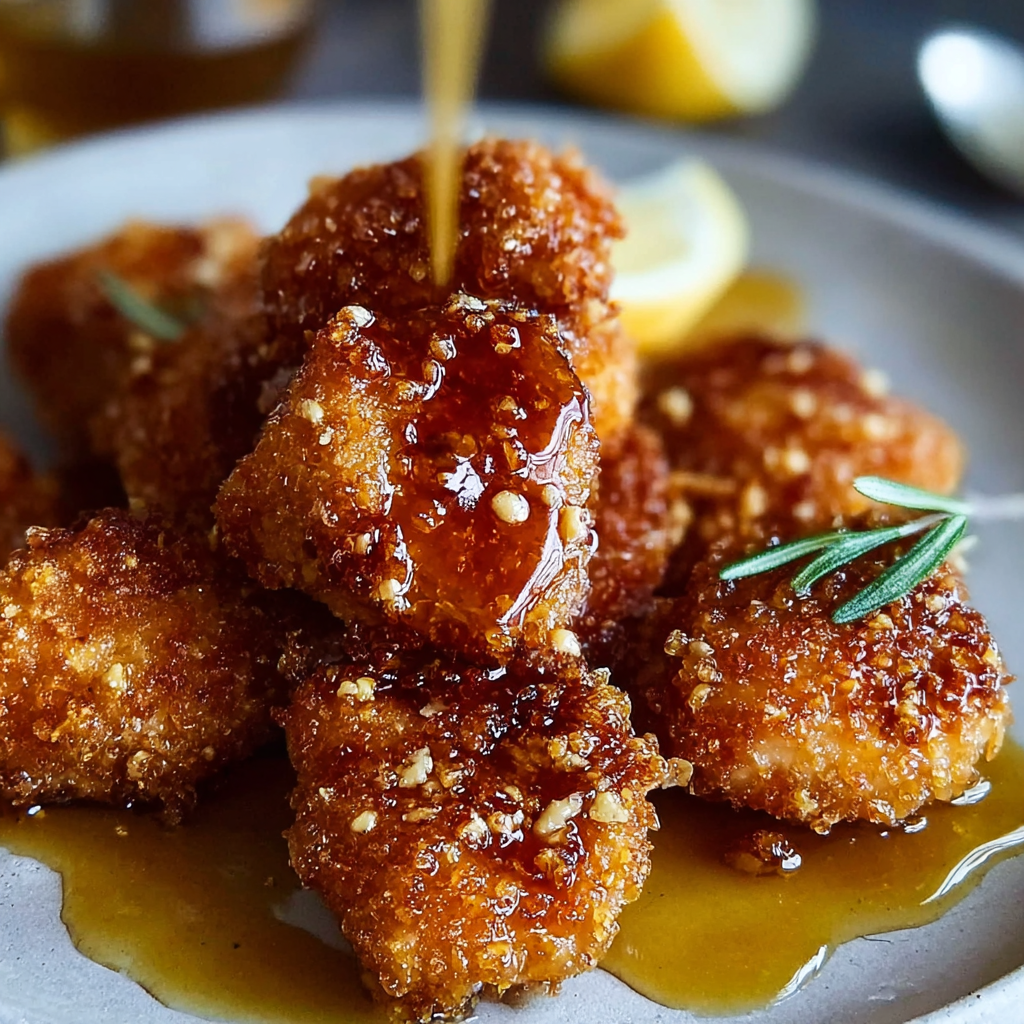
Baked Crunchy Honey Chicken

Crispy panko-coated chicken thighs baked and finished with a sticky honey-soy glaze — an easy weeknight favorite that’s crunchy, sweet, and satisfying.

This Baked Crunchy Honey Chicken has been a weeknight lifesaver in my kitchen for years. I first put this combination together on a busy week when I wanted the comfort and crunch of fried chicken without the mess and extra oil. Using boneless, skinless chicken thighs keeps the meat juicy while panko breadcrumbs deliver exceptional crunch after a short bake. The honey-soy glaze is simple but transformative — it caramelizes just enough in the oven to create a shiny, stick-to-your-fork finish that my family still raves about.
I discovered this version while trying to adapt a busy-parents-friendly dinner from a takeout favorite. The technique of triple-coating the chicken (flour, egg, breadcrumbs) locks in moisture and gives a sturdy crust that won’t go soggy under the glaze. It’s become our go-to when friends visit because it looks and tastes like something more elaborate, but it literally takes under an hour from start to finish. The sweet-salty balance of honey and soy, with a warm whisper of paprika and garlic, hits a nostalgic place for everyone at the table.
Why You'll Love This Recipe
- Ready in around 45 minutes from start to finish — prep and baking are straightforward, ideal for busy weeknights when you want dinner fast but satisfying.
- Uses pantry staples: flour, eggs, panko, honey, and soy sauce. No specialty groceries needed, and substitutions are simple if you’re missing an item.
- Panko breadcrumbs create an extra-crunchy exterior that stands up to a sticky glaze, eliminating the typical sogginess that happens with other coatings.
- Make-ahead friendly: you can bread the pieces and refrigerate them until baking, or prepare the glaze early and warm it when the chicken is done.
- Crowd-pleaser for families and gatherings — bite-sized pieces are great for dipping, serving on a platter, or pairing with simple sides like rice or a crisp salad.
- Lower-oil approach than frying: baking with a light spray gives crisp results with less fat and cleanup.
Personally, the first time I served this at a casual dinner party, guests kept asking for the recipe — they assumed it had been fried. My kids love the crunchy exterior, and my partner appreciates the savory honey finish. Over time I’ve tweaked the glaze ratio to reach the perfect balance: enough honey for shine and depth, enough soy for savory counterpoint.
Ingredients
- Chicken: 1 1/2 pounds boneless, skinless chicken thighs. Thighs stay moister than breasts during baking; buy fresh or thawed, trim excess fat, and cut into 1- to 1 1/2-inch bite-sized pieces for even cooking.
- Flour: 1 cup all-purpose flour. Lightly seasoned with salt and spices to form the first layer that helps the egg adhere and builds a sturdier crust.
- Eggs: 2 large eggs, beaten. Use at room temperature for a smoother coating and better adhesion of breadcrumbs.
- Breadcrumbs: 1 cup breadcrumbs, preferably panko for extra crunch. Panko’s coarser texture gives a crispier finish; if using regular breadcrumbs, expect a slightly denser crust.
- Honey: 1/2 cup honey. Use pure liquid honey (clover or wildflower) — avoid crystallized honey unless warmed gently before mixing.
- Soy Sauce: 2 tablespoons low-sodium soy sauce to keep salt levels balanced while adding savory umami to the glaze.
- Spices: 1 teaspoon garlic powder, 1 teaspoon onion powder, 1 teaspoon paprika for warmth and color, 1/2 teaspoon salt, 1/2 teaspoon black pepper to season the flour for even flavor throughout.
- Cooking Spray: or a tablespoon of neutral oil for greasing the baking sheet; a light spray helps the breadcrumbs crisp without excess oil.
Instructions
Preheat and Prepare: Preheat your oven to 400°F (200°C). Line a baking sheet with parchment paper and, if you have one, place a wire rack on top of the sheet to allow hot air circulation around the pieces. This encourages crisping on all sides. If not using a rack, space pieces well so air flows freely. Trim and Cut: Pat the chicken completely dry with paper towels to remove surface moisture — this is crucial for crisping. Trim excess fat and cut into uniform bite-sized pieces (about 1 to 1 1/2 inches) so they cook evenly and reach a safe internal temperature at the same time. Set Up Breading Station: Arrange three shallow bowls: one with the seasoned flour (mix flour, salt, pepper, garlic powder, onion powder, and paprika), one with beaten eggs, and one with panko breadcrumbs. The seasoned flour forms a dry base that bites into the egg, which then binds the panko. Coat the Pieces: Working in batches, dredge each chicken piece in flour, shaking off excess. Dip into the beaten eggs, then press into the breadcrumbs, turning to coat thoroughly. For an extra thick crust, repeat the egg and panko step once more. Place coated pieces on the prepared rack or sheet with spacing between them. Lightly Oil and Bake: Lightly spray the coated pieces with cooking spray or brush with oil to promote browning. Bake at 400°F (200°C) for 20–25 minutes until golden and the internal temperature reads 165°F (75°C). If you used a wire rack, flip once halfway through for even color. Make the Glaze: While the chicken bakes, combine 1/2 cup honey and 2 tablespoons soy sauce in a small saucepan over low heat. Stir until the mixture is warm and combined — about 2–3 minutes. Do not boil; you only need to thin and blend the honey for easier coating. Glaze and Finish: When the pieces are baked through, remove the tray and drizzle the honey-soy glaze evenly over the chicken. Return to the oven for an additional 5–10 minutes so the glaze sets and becomes slightly sticky. Watch closely so the sugars in the honey don’t burn. Rest and Serve: Let the chicken rest 3–5 minutes after removing from the oven; this keeps the crust crunchy while the glaze firms up. Serve warm with garnishes like sliced scallions, sesame seeds, or a squeeze of lime if you like bright contrast.
You Must Know
- This keeps well refrigerated for up to 3 days; reheat in a 375°F (190°C) oven to restore crispness rather than microwaving, which softens the crust.
- Freezes well for up to 3 months if individually flash-frozen on a tray then transferred to a freezer bag; reheat from frozen in the oven until internal temp reaches 165°F (75°C).
- High in protein and a balanced meal when paired with whole grains and vegetables; watch sodium if using regular soy sauce.
- To ensure safety, always check that chicken pieces reach an internal temperature of 165°F (75°C) with an instant-read thermometer.
What I love most about this dish is the contrast: a crunchy shell, juicy interior, and glossy, sticky glaze. Friends often tell me the texture reminds them of takeout, but with a cleaner ingredient list and less grease. The small adjustments — drying the chicken well and using a wire rack — consistently deliver pro-level results at home.
Storage Tips
Store leftover pieces in an airtight container in the refrigerator for up to 3 days. To retain crunch, place paper towels under the chicken to absorb excess moisture and reheat in a preheated 375°F (190°C) oven on a wire rack for 8–10 minutes. For freezing, arrange cooled pieces in a single layer on a baking sheet and freeze until solid, then transfer to a resealable freezer bag; reheat directly from frozen at 400°F (200°C) for 12–18 minutes until heated through.
Ingredient Substitutions
If you’re out of panko, regular breadcrumbs work — expect a slightly denser texture. Swap honey with maple syrup or agave for a different sweetness profile; reduce heat time slightly if the syrup is thinner. For gluten-free options, use a 1:1 gluten-free flour and gluten-free breadcrumbs. To make this lower-sodium, use a low-sodium soy sauce or tamari. For leaner meat, chicken breast can be used but monitor baking time closely to avoid dryness.
Serving Suggestions
Serve over steamed jasmine or brown rice, alongside quick pickled cucumbers, or with a crunchy cabbage slaw to cut through the sweetness. It’s also fantastic in tacos, wrapped in lettuce cups, or served on a sheet pan with roasted broccoli for an all-in-one meal. Garnish with sliced scallions, toasted sesame seeds, or a drizzle of sriracha mayo for an added kick.
Cultural Background
This dish is a home-kitchen fusion: panko breadcrumbs and soy sauce nod to Japanese and broader East Asian pantry ingredients, while the honey glaze and baked approach are rooted in American weeknight cooking sensibilities. It reflects how global flavors come together in simple home-cooked meals — familiar textures combined with umami-sweet glazes that appeal widely.
Seasonal Adaptations
In spring and summer, pair with a bright citrus salad and fresh herbs like cilantro or mint. In fall and winter, swap honey for a darker honey or add a splash of apple cider vinegar to the glaze for depth. During holidays, increase glaze quantities and add crushed roasted nuts for texture and a festive finish.
Meal Prep Tips
For weekly meals, double the batch and bread the chicken in advance; store uncooked, breaded pieces between parchment layers in the refrigerator for up to 24 hours. Bake fresh when ready to serve. Pack portions with rice and steamed vegetables in divided containers; reheat in the oven to maintain the crust rather than microwaving.
Whether you’re feeding a crowd or making a simple family dinner, this baked crunchy honey chicken is a reliable, delicious choice. Its ease, texture, and sticky-sweet glaze make it a dish I keep returning to — and I hope it becomes a favorite in your kitchen too.
Pro Tips
Pat the chicken completely dry before breading to ensure the coating crisps properly.
Use a wire rack over the baking sheet to allow air circulation and crisper crust on all sides.
Warm crystallized honey gently before mixing so it blends smoothly with soy sauce.
Do not boil the honey glaze; heat just until combined to avoid burning the sugars.
This nourishing baked crunchy honey chicken recipe is sure to be a staple in your kitchen. Enjoy every moist, high protein slice — it is perfect for breakfast or as a wholesome snack any time.
Tags
Baked Crunchy Honey Chicken
This Baked Crunchy Honey Chicken recipe makes perfectly juicy, tender, and flavorful steak every time! Serve with potatoes and a side salad for an unforgettable dinner in under 30 minutes.
Instructions
Preheat Oven and Prep Sheet
Preheat oven to 400°F (200°C). Line a baking sheet with parchment paper and set a wire rack on top if available for better air circulation.
Trim and Cut Chicken
Pat chicken dry, trim excess fat, and cut into uniform 1–1 1/2-inch pieces so they cook evenly.
Set Up Breading Station
Place seasoned flour in one bowl (flour plus salt, pepper, garlic powder, onion powder, paprika), beaten eggs in a second, and panko in a third.
Coat Chicken Pieces
Dredge each piece in flour, dip in egg, then press into panko. For extra crunch, repeat the egg and panko step once more.
Arrange and Oil
Place coated pieces on the prepared rack or sheet with spacing between each. Lightly spray with cooking spray or brush with oil.
Bake Until Golden
Bake at 400°F (200°C) for 20–25 minutes, flipping once halfway if not on a rack, until golden and internal temp reaches 165°F (75°C).
Prepare Honey Glaze
Gently warm 1/2 cup honey with 2 tablespoons soy sauce in a small saucepan over low heat, stirring until blended; avoid boiling.
Glaze and Finish
Drizzle the warm glaze over baked pieces and return to oven for 5–10 minutes so the glaze sets into a sticky coating.
Rest and Serve
Allow chicken to rest 3–5 minutes so the glaze firms. Serve with rice, slaw, or your preferred sides and garnish as desired.
Last Step: Please leave a rating and comment letting us know how you liked this recipe! This helps our business to thrive and continue providing free, high-quality recipes for you.
Nutrition
Did You Make This?
Leave a comment & rating below or tag
@mrsrecipe on social media!
Categories:
You might also like...

Best Chicken Fried Steak
A crispy, tender chicken fried steak with a rich sausage cream gravy — classic comfort food perfect for family dinners and weekend indulgence.

Fluffy Japanese Soufflé Pancakes
Tall, cloudlike pancakes with a delicate eggy interior and golden exterior, perfect for a celebratory breakfast or a relaxed weekend treat.

Creamy Chicken Stuffed Peppers
Bell peppers filled with a rich, creamy chicken and cheese mixture—simple to assemble, family-friendly, and perfect for weeknight dinners or make-ahead meals.
Did You Make This?
Leave a comment & rating below or tag @mrsrecipe on social media!
Rate This Recipe
Share This Recipe
Enjoyed this recipe? Share it with friends and family, and don't forget to leave a review!
Comments (1)
This recipe looks amazing! Can't wait to try it.
Comments are stored locally in your browser. Server comments are displayed alongside your local comments.
Hi, I'm Clara!
What's Popular

Get My 30-Minute Meals email series!
Quick and easy dinner ideas delivered to your inbox.