
Cheesecake Tacos

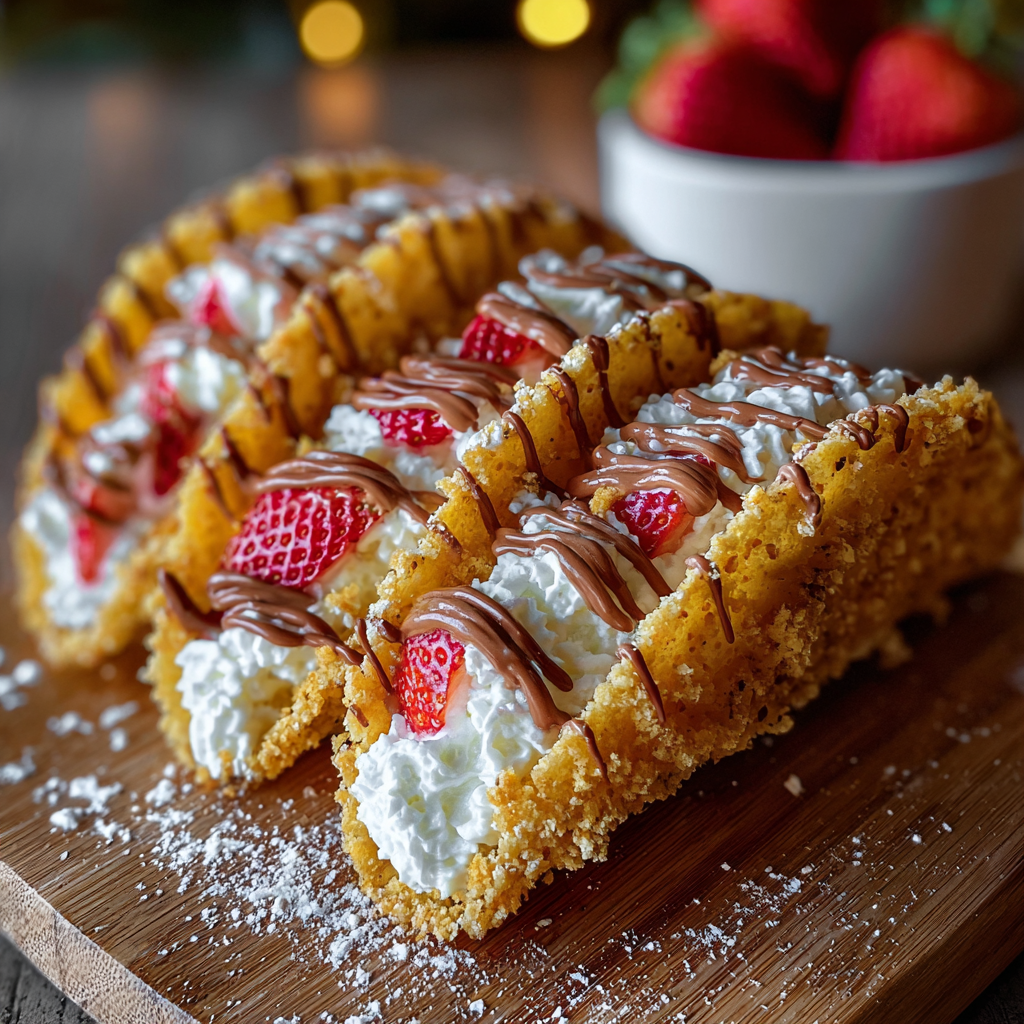
Festive cheesecake tacos with crisp white chocolate coated shells, graham crumb coating, and a silky cream cheese filling topped with sprinkles and crushed candy canes.

Why You'll Love This Recipe
- Easy to make in about 40 minutes of active time, with additional chilling time ideal for busy hosts who need a make ahead option.
- Uses pantry staples such as flour tortillas and cream cheese and a few festive garnishes to create a show stopping dessert without specialty equipment.
- Portable single servings that are perfect for parties, cookie swaps, and holiday brunches where guests can grab and go.
- Customizable coatings and toppings so you can adapt to dietary needs or seasonal ingredients such as chopped nuts or toasted coconut.
- Techniques in this recipe teach simple shell shaping and basic ganache brushing that are useful for other desserts.
- Quick bake for a set shell with no deep frying required making for a lighter and quicker alternative to fried shells.
When I served these the first time, my neighbor told me she could not believe something that looked so elaborate came together so quickly. My kids loved the hands on aspect of decorating their own taco, which made the recipe a hit on a chilly morning when we wanted something festive. Over the years I have found the graham and candy cane coating to be the key to turning ordinary tortillas into a holiday worthy vessel for a rich filling.
Ingredients
- Large flour tortillas: Use five large tortillas that are pliable and not overly dry. Look for brand tortillas that list flour, water, oil and salt as primary ingredients so they crisp evenly. Stale tortillas will crack when shaped.
- Unsalted butter: One tablespoon melted butter to brush the cut circles so they brown evenly and hold shape in the tin. Unsalted lets you control the seasoning and sweetness.
- White chocolate: Thirteen ounces of high quality white chocolate, chopped. Brands with cocoa butter will melt more smoothly. Avoid white chips that list hydrogenated oils if possible for a glossy finish.
- Graham cracker crumbs: One cup finely crushed. You can use store bought crumbs or blitz whole graham crackers in a food processor for fresher flavor.
- Christmas sprinkles and crushed candy canes: Use quarter cup sprinkles and two tablespoons crushed candy canes for festive color and peppermint crunch. Swap colors to match occasions.
- Cream cheese: Twelve ounces softened to room temperature for a lump free filling. Full fat gives the best texture and flavor.
- Powdered sugar: Two thirds cup to sweeten the filling. Powdered sugar helps the cream cheese stay smooth compared to granulated.
- Vanilla extract: One tablespoon pure vanilla for aromatic depth and balance.
- Heavy whipping cream: One cup whipped to thicken the filling and lighten the texture so it pipes cleanly into the shells.
Instructions
Preheat and prepare the tin: Preheat the oven to 350 degrees Fahrenheit 176 degrees Celsius. Turn a standard muffin tin upside down and set aside so the tortillas will drape over the rounded bottoms to form taco shaped shells. Lightly grease the bottom side of the muffin tin if your surface is not non stick to prevent sticking. Cut the tortillas: Using a 4 inch cookie cutter, cut approximately three circles from each large tortilla yielding about fifteen circles. Keep the scrap pieces to warm and re roll if you want additional shells. Coat each circle lightly with the melted unsalted butter using a pastry brush so the edges brown evenly during baking. Shape and bake the shells: Gently drape each buttered circle over the rounded side of the prepared inverted muffin tin so the edges hang down to form a taco shell. Arrange in the tin and bake for five to six minutes until edges are lightly browned and the shell holds shape. Watch carefully as flour tortillas can go from golden to dark quickly. Remove and leave on the tin to cool completely which helps retain the curved shape. Prepare coatings: In a shallow bowl combine one cup graham cracker crumbs, one quarter cup Christmas sprinkles, and two tablespoons crushed candy canes. This mixture will adhere better if the white chocolate is warm and tacky. Melt the white chocolate: Melt the chopped white chocolate in a double boiler over simmering water stirring frequently until smooth, or microwave in twenty second intervals stirring between each until completely melted. Allow it to cool slightly so it is warm but not hot which could warp the shells. Coat the shells: Brush the cooled taco shells inside and along the edges with a thin layer of melted white chocolate then immediately roll or press each shell into the graham and sprinkle mixture so it adheres. Set the coated shells on a baking sheet lined with parchment and refrigerate until the chocolate sets, about fifteen to twenty minutes. Make the filling: Beat twelve ounces softened cream cheese with two thirds cup powdered sugar and one tablespoon vanilla extract until smooth and lump free. In a separate bowl whip one cup heavy whipping cream until soft peaks form then fold the whipped cream into the cream cheese mixture in two additions until uniform and thick enough to pipe. Assemble the tacos: Transfer the filling to a piping bag fitted with a wide tip and pipe into each chilled shell, filling to the top and smoothing if desired. Sprinkle additional Christmas sprinkles, crushed candy canes and a few M and Ms on top for color and texture. Chill for an additional fifteen minutes before serving so the filling firms slightly.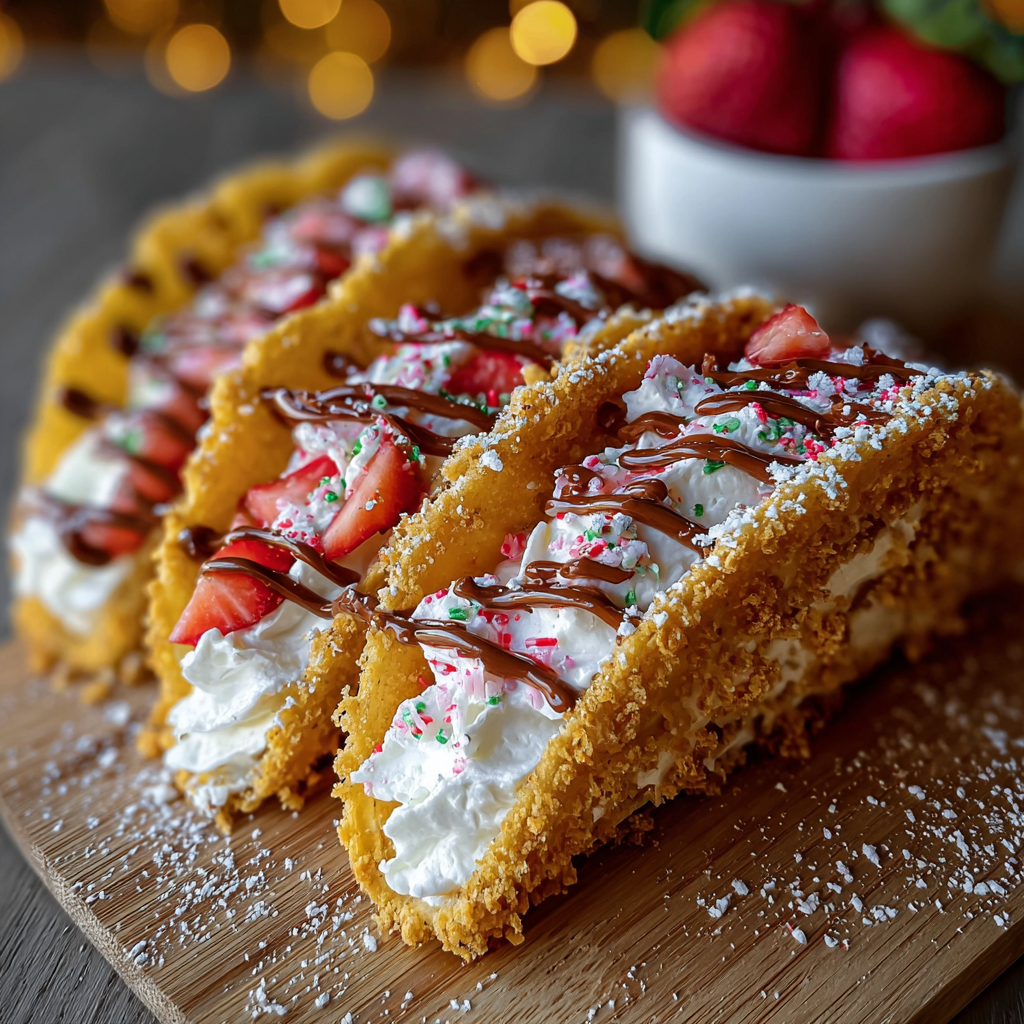
You Must Know
- These hold best when made the same day but will keep in the refrigerator for up to three days in an airtight container filled with minimal moisture exposure.
- They freeze well for up to three months if assembled without sprinkles and thawed in the refrigerator before decorating.
- The filling is high in dairy and sugar so store separately from the shells if serving outdoors to avoid soggy shells in warm weather.
- Use full fat cream cheese and heavy cream for the creamiest texture and best piping performance.
- If you need more shells cut additional tortillas and bake an extra minute or two until golden but not browned.
My favorite aspect is how the simple technique of brushing with melted white chocolate transforms a humble flour tortilla into a delicate crisp shell that feels special. The first time my sister tried one she closed her eyes and said it tasted like a mini slice of cheesecake with a festive crunch. I have kept notes on timing and temperature so every batch has consistent results which makes them reliable for events where timing matters.
Storage Tips
To maintain the crisp shell texture store shells and filling separately whenever possible. Keep chilled coated shells in a single layer in an airtight container lined with parchment to prevent sticking and condensation. The assembled tacos will keep in the refrigerator for up to three days but expect the outer coating to soften slightly after the first day. For longer storage, freeze assembled tacos without sprinkles for up to three months wrapped individually in plastic and placed in a sealed freezer bag. Thaw overnight in the refrigerator and add fresh garnishes just before serving to restore color and crunch.
Ingredient Substitutions
If you need gluten free options use certified gluten free flour tortillas and substitute gluten free graham crumbs. For a dairy free version use a plant based cream cheese and coconut cream whipped to firm peaks in place of heavy cream, and choose dairy free white chocolate alternatives made with cocoa butter substitutes. If you prefer less sweetness, reduce powdered sugar by two tablespoons and add a teaspoon of lemon juice to brighten the cream cheese filling. For adults try mixing one tablespoon of liqueur such as peppermint schnapps into the melted white chocolate for an added festive note.
Serving Suggestions
Present these on a long wooden board or mirrored tray with small bowls of extra sprinkles and candy for guests to personalize their own taco. Pair with a cup of strong coffee or an espresso based drink to balance the sweetness, or serve alongside a citrusy sorbet if you want a palate cleansing contrast. For a brunch spread include mini fruit skewers and maple glazed pastries to create visual variety. Add edible flowers or mint leaves for an elegant touch when serving at afternoon gatherings.
Cultural Background
While not rooted in traditional cuisine these playful treats borrow techniques from American cheesecake and taco shaped pastries that appear across festive baking. Shaping tortillas as vessels is inspired by street food presentation where edible containers serve as a fun and portable format. The use of graham crumbs pays homage to classic American cheesecake crusts and the combination of white chocolate and peppermint comes from seasonal confectionery traditions. This recipe blends dessert styling with the convenience of handheld street fare to create a modern party sweet that honors both simplicity and festive flair.
Seasonal Adaptations
Swap crushed candy canes for chopped roasted pistachios and orange zest for a winter citrus variation. In spring use pastel sprinkles and chopped strawberries for a fresher take. For autumn replace white chocolate with melted caramel and coat shells with crushed gingersnap cookies and toasted pecans. For summer parties consider a tropical version with toasted coconut coating and mango puree folded into the filling for a light bright filling that pairs well with chilled shells.
Meal Prep Tips
Plan to bake and coat shells up to one day ahead then chill until you are ready to fill. Whip the filling the morning of your event and transfer to a piping bag for quick assembly ten to fifteen minutes before guests arrive. Store filled tacos in a single layer in an airtight container and add final garnishes right before serving to maintain texture and color. Bring a small cooler for outdoor events to keep them chilled and stable if you are serving in warm weather.
These cheesecake shaped tacos are meant to be shared and customized. Once you master the basic technique you can create seasonal variations that become part of your celebration repertoire. Enjoy creating bright, crunchy, creamy little treats that always spark a smile.
Pro Tips
Soften cream cheese to room temperature for a lump free filling and easier whipping.
Brush shells with warm but not hot white chocolate to avoid warping the tortilla shape.
Chill shells thoroughly before filling to prevent the filling from softening the coating.
Keep extra garnishes on the side so guests can personalize their own tacos.
This nourishing cheesecake tacos recipe is sure to be a staple in your kitchen. Enjoy every moist, high protein slice — it is perfect for breakfast or as a wholesome snack any time.
Tags
Cheesecake Tacos
This Cheesecake Tacos recipe makes perfectly juicy, tender, and flavorful steak every time! Serve with potatoes and a side salad for an unforgettable dinner in under 30 minutes.
Ingredients
Shells
Coating
Filling
Garnish
Instructions
Preheat and prepare the tin
Preheat oven to 350 degrees Fahrenheit 176 degrees Celsius. Turn a standard muffin tin upside down and set aside. Lightly grease if needed to prevent sticking.
Cut the tortillas
Cut each large flour tortilla into 4 inch circles using a cookie cutter yielding about three circles per tortilla. Brush each circle lightly with melted unsalted butter.
Shape and bake
Drape each buttered circle over the inverted muffin tin to form taco shaped shells. Bake for five to six minutes until edges are lightly browned then remove and cool on the tin to retain shape.
Prepare coating
Combine graham cracker crumbs Christmas sprinkles and crushed candy canes in a shallow bowl to create the coating mixture.
Melt white chocolate
Melt chopped white chocolate in a double boiler or microwave in short intervals stirring until smooth. Cool slightly so it is warm but not hot.
Coat shells
Brush the cooled shells with melted white chocolate then immediately coat with the graham and sprinkle mixture. Place on parchment and refrigerate until set.
Make filling
Beat softened cream cheese with powdered sugar and vanilla until smooth. Whip heavy cream to soft peaks then fold into the cream cheese mixture until thick and pipeable.
Assemble and garnish
Pipe the filling into chilled shells and top with extra sprinkles crushed candy canes and M and Ms. Chill briefly before serving.
Last Step: Please leave a rating and comment letting us know how you liked this recipe! This helps our business to thrive and continue providing free, high-quality recipes for you.
Nutrition
Did You Make This?
Leave a comment & rating below or tag
@mrsrecipe on social media!
Categories:
You might also like...

Best Chicken Fried Steak
A crispy, tender chicken fried steak with a rich sausage cream gravy — classic comfort food perfect for family dinners and weekend indulgence.

Fluffy Japanese Soufflé Pancakes
Tall, cloudlike pancakes with a delicate eggy interior and golden exterior, perfect for a celebratory breakfast or a relaxed weekend treat.

Creamy Chicken Stuffed Peppers
Bell peppers filled with a rich, creamy chicken and cheese mixture—simple to assemble, family-friendly, and perfect for weeknight dinners or make-ahead meals.
Did You Make This?
Leave a comment & rating below or tag @mrsrecipe on social media!
Rate This Recipe
Share This Recipe
Enjoyed this recipe? Share it with friends and family, and don't forget to leave a review!
Comments (1)
This recipe looks amazing! Can't wait to try it.
Comments are stored locally in your browser. Server comments are displayed alongside your local comments.
Hi, I'm Clara!
What's Popular

Get My 30-Minute Meals email series!
Quick and easy dinner ideas delivered to your inbox.