>>
30-MINUTE MEALS! Get the email series now →


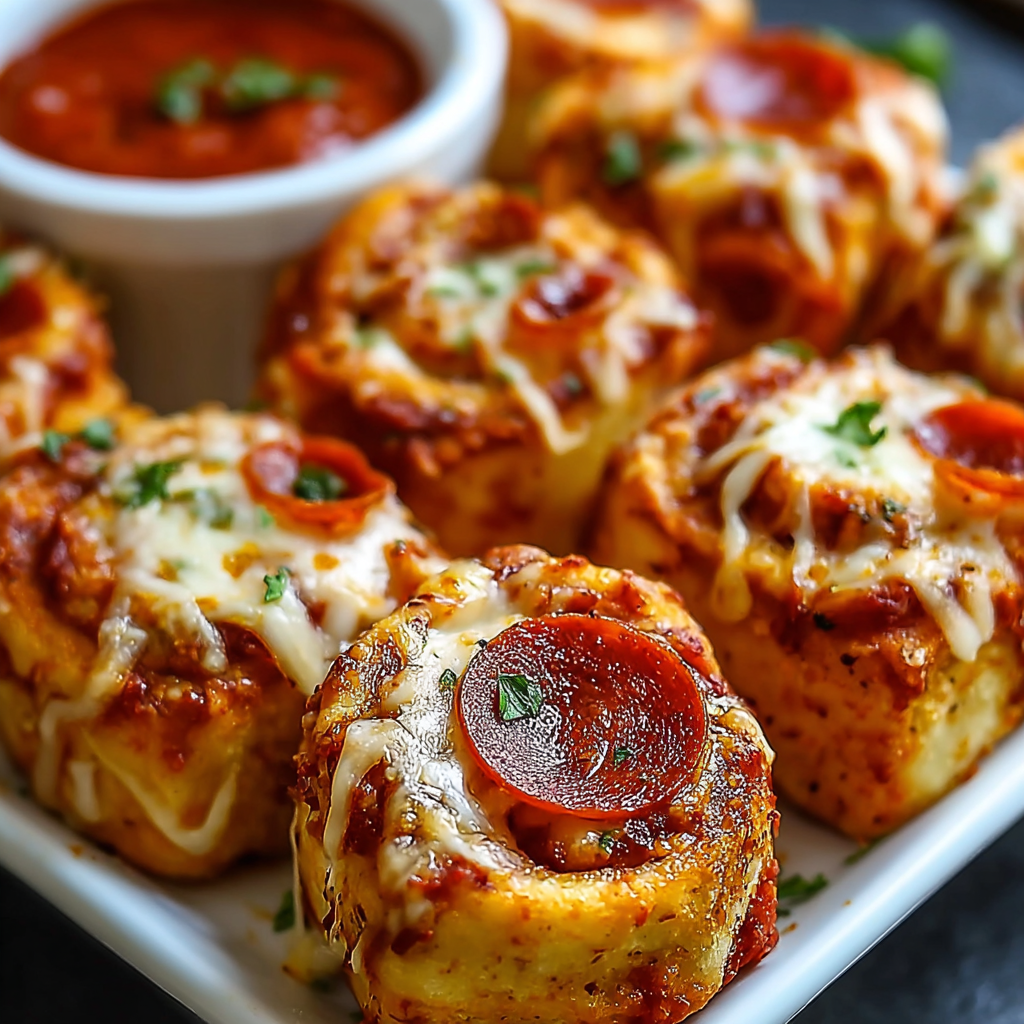
A quick, family-friendly bite: soft tortillas filled with melty mozzarella, pepperoni and savory pizza sauce, brushed with oil and baked to golden perfection.

This recipe for Cheesy Pepperoni Pizza Roll-Ups is the kind of simple comfort food that became a household favorite the first time I made it for an impromptu movie night. I discovered the combination during a busy week when I needed something fast, portable, and loved by kids and adults alike. The roll-ups are warm, gooey, and satisfyingly savory — the toasted tortilla adds a light crisp contrast to a molten center of mozzarella and pepperoni. They’re the sort of snack that makes everyone pause what they’re doing and gather around the kitchen island.
I started making these roll-ups with store-bought small flour tortillas and a jar of pizza sauce, and over time I learned a few small tricks that make them stand out: a light brush of oil on top for shine and browning, a dusting of garlic and Italian seasoning for an extra flavor lift, and a tight roll that keeps the filling inside during baking. They’re perfect for casual weeknight dinners, game-day spreads, or packed lunches. They reheat well and travel even better — once, I brought a tray to a backyard potluck and came home with an empty pan and a few new recipe requests.
In our family these roll-ups are a near-weekly occurrence. My youngest loved peeling the pepperoni off his plate as a “snack inspector” while the adults appreciated how easily the recipe scales when unexpected guests arrive. They’ve saved more than one rushed evening and become a regular request at our casual get-togethers.

My favorite part of this recipe is how adaptable it is: whether I swap pepperoni for grilled chicken, add fresh basil after baking, or use a robust marinara, the structure stays the same. One winter evening these were the star of a simple dinner with a big kale Caesar, and they disappeared almost immediately.
To refrigerate, cool completely and store in an airtight container for up to 4 days. For freezing, arrange baked or unbaked roll-ups on a baking sheet until firm, then transfer to freezer bags with parchment between layers to prevent sticking; label and freeze for up to 3 months. Reheat from frozen at 375°F for 12–15 minutes, or thaw overnight in the fridge and bake 8–10 minutes. Use oven or air fryer reheating for best texture — microwaving is fastest but softens the tortilla.
Swap whole-milk mozzarella with part-skim for fewer calories, or use provolone or cheddar for a different flavor profile — adjust quantity to taste. For gluten-free, use certified gluten-free tortillas (watch size and pliability). Replace pepperoni with cooked Italian sausage, deli salami, or sautéed mushrooms for a vegetarian version (omit pepperoni and add a sprinkle of red pepper flakes for heat). If you don’t have pizza sauce, mix canned tomato sauce with ½ teaspoon dried oregano and a pinch of sugar.
Serve warm with marinara or ranch dipping sauces, alongside a crisp tossed salad or roasted vegetables for a balanced meal. For parties, cut each roll-up in half on the diagonal and arrange on a platter with toothpicks. Garnish with torn fresh basil, a dusting of grated Parmesan, or a drizzle of garlic-infused olive oil to elevate the presentation.
Assemble the roll-ups ahead of time and store covered in the refrigerator for up to 24 hours before baking — this short rest lets flavors marry and saves evening prep time. For freezer meal prep, assemble on a sheet pan, freeze until firm, then pack in freezer bags; bake from frozen with a few extra minutes for a quick ready-made meal. Use individual silicone muffin liners to bake single servings for grab-and-go breakfasts or lunches.
In summer swap pepperoni for thin slices of grilled zucchini or fresh tomatoes with basil for a lighter approach. In colder months add sautéed onions and bell peppers or a pinch of smoked paprika for warmth. Holiday gatherings welcome additions like caramelized onions and roasted red peppers for a more sophisticated finger food variation.
These roll-ups are a playful, hand-held interpretation of classic pepperoni pizza flavors adapted to tortilla form — a pantry-friendly cross-over that reflects how Italian-American favorites are often reimagined in home cooking. They borrow pizza’s core elements (sauce, cheese, cured meat) while leveraging the convenience and pliability of tortillas, an everyday staple in many kitchens.
Every time I make a batch, I’m reminded of how small adaptations — a brush of oil, a tight roll, or a quick broil — can elevate a simple assembly into something memorable. Give them a try, make them your own, and don’t be surprised if they become a household staple.
Brush the tops lightly with oil for even browning and to keep excess moisture from soaking the tortilla.
Shred fresh mozzarella from a block for smoother melting and avoid pre-shredded if possible for better texture.
Roll tightly and place seam side down to prevent unrolling during baking and to keep fillings sealed.
This nourishing cheesy pepperoni pizza roll-ups recipe is sure to be a staple in your kitchen. Enjoy every moist, high protein slice — it is perfect for breakfast or as a wholesome snack any time.
Yes — you can assemble and refrigerate them up to 24 hours before baking. Cover tightly to prevent drying.
Freeze unbaked or baked roll-ups in a sealed bag for up to 3 months. Reheat from frozen at 375°F for 12–15 minutes.
This Cheesy Pepperoni Pizza Roll-Ups recipe makes perfectly juicy, tender, and flavorful steak every time! Serve with potatoes and a side salad for an unforgettable dinner in under 30 minutes.
Preheat oven to 350°F. Grease a large baking pan lightly with oil or nonstick spray to prevent sticking.
Lay each tortilla flat. Spread about 1 tablespoon of pizza sauce evenly over the center, leaving a 1/2-inch border.
Sprinkle roughly 1/4 cup shredded mozzarella per tortilla, then top with about 4 pepperoni slices. Fold pepperoni slightly into the cheese for stability.
Roll each tortilla tightly and place seam-side down in the prepared pan. Arrange roll-ups snugly to help retain shape during baking.
Brush the tops with a light coating of oil (about 1 teaspoon per roll-up) and sprinkle the garlic powder, Italian seasoning, and garlic salt evenly.
Bake at 350°F for about 10 minutes, until cheese is melted and roll-ups are heated through. For a crisp finish, broil 1–2 minutes or use an air fryer at 400°F for 5–8 minutes.
Last Step: Please leave a rating and comment letting us know how you liked this recipe! This helps our business to thrive and continue providing free, high-quality recipes for you.
Leave a comment & rating below or tag
@mrsrecipe on social media!

A crispy, tender chicken fried steak with a rich sausage cream gravy — classic comfort food perfect for family dinners and weekend indulgence.

Tall, cloudlike pancakes with a delicate eggy interior and golden exterior, perfect for a celebratory breakfast or a relaxed weekend treat.

Bell peppers filled with a rich, creamy chicken and cheese mixture—simple to assemble, family-friendly, and perfect for weeknight dinners or make-ahead meals.
Leave a comment & rating below or tag @mrsrecipe on social media!
Enjoyed this recipe? Share it with friends and family, and don't forget to leave a review!
This recipe looks amazing! Can't wait to try it.
Comments are stored locally in your browser. Server comments are displayed alongside your local comments.
Quick and easy dinner ideas delivered to your inbox.
