
Delicious No-Bake Soft Peppermint Balls

Soft, no-bake peppermint confections that come together in minutes — bright holiday colors, melt-in-your-mouth texture, and simple pantry ingredients.

This no-bake soft peppermint balls recipe is my go-to during the holidays when I want something festive, quick, and wonderfully nostalgic. I first stumbled onto this combination one December evening while rummaging through the pantry trying to create a last-minute edible gift. The result tasted like the inside of a peppermint candy but without the hard crunch — creamy, tender, and pleasantly minty. Friends and family kept asking me for the recipe after trying them at a cookie swap, and since then they've become a tradition for stockings and small hostess presents.
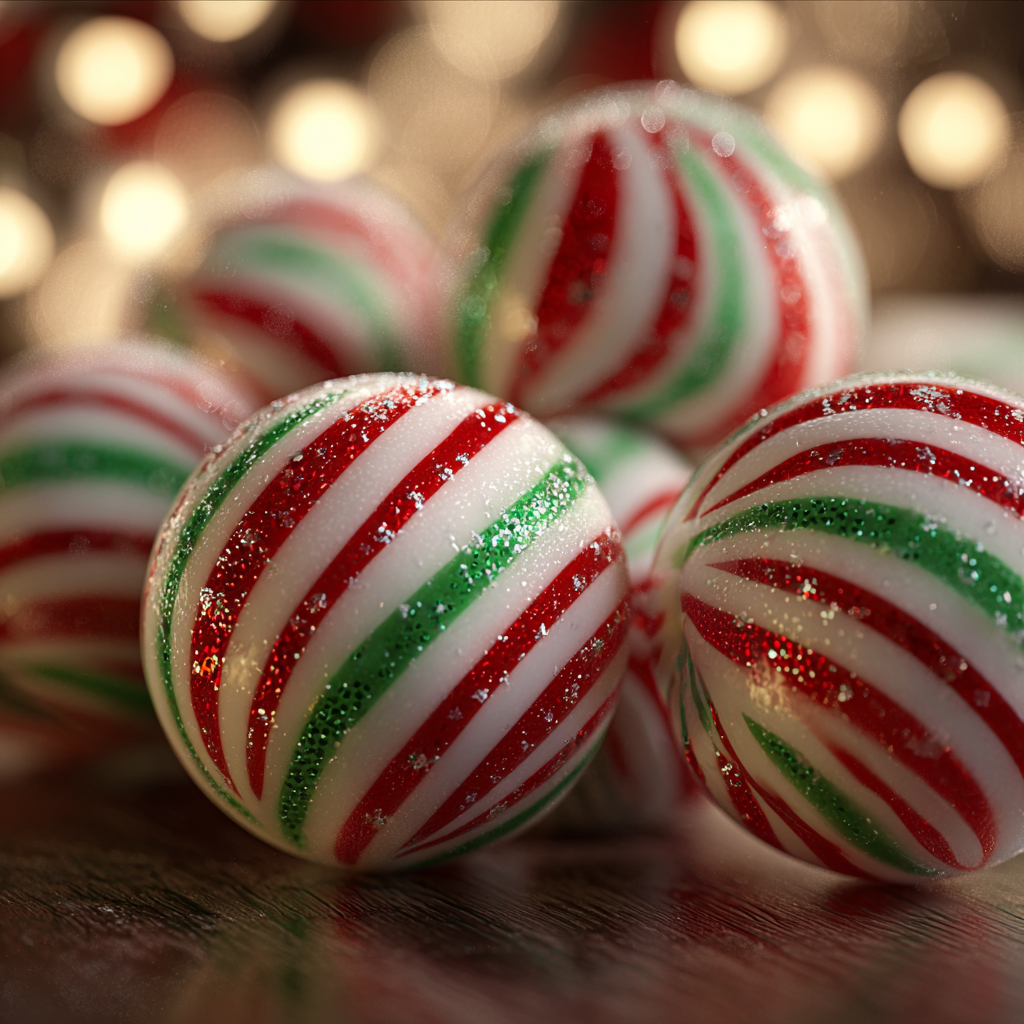
The texture is what makes these candies special: soft but holding their shape, like a tender sugar cookie turned into a bite-sized sweet. The peppermint extract gives a clean, classic mint flavor while the butter and a touch of milk create just enough richness to keep the confection pliable and satisfying. Coloring them in red and green ropes adds that holiday cheer; kids love helping twist the ropes into striped patterns. This is a forgiving, creative treat — simple enough for beginners and customizable enough for seasoned bakers who want to add a personal twist.
Why You'll Love This Recipe
- Ready in under 30 minutes: active prep is about 15–20 minutes, plus a short chill, so these come together fast for last-minute gifts.
- No baking required: perfect when your oven is already overloaded or you want a cool, soft candy without heating sugar to temperature.
- Uses pantry staples: powdered sugar, butter, and a little milk — swap in vegan butter and plant milk for a dairy-free option.
- Kid-friendly assembly: coloring, rolling, and twisting ropes is a fun activity for helpers of all ages.
- Customizable finish: dip in chocolate, roll in crushed candy cane, or dust with edible glitter for a festive look.
- Great for gifting and make-ahead: chill fully, store in airtight containers, and they can be packed for travel.
Personally, I love that these make-ahead candies fit into hectic holiday plans. One year I made several batches the weekend before Christmas, packed them into small tin boxes, and watching neighbors' faces light up as they opened them made the effort worth it. The bright red and green always spark conversation — and more than once someone has asked if they’re filled with peppermint fondant.
Ingredients
- Powdered sugar (2 cups, sifted): Sifting removes lumps for a silky texture and makes the dough smooth. I use Domino or C&H when available; organic brands work fine too. The powdered sugar is the bulk and sweet base, so measure by level cups for consistent results.
- Light corn syrup (1 tablespoon): Adds chewiness and helps the mixture set without becoming brittle. You can substitute mild-flavored honey or maple syrup if you prefer a different sweetness profile.
- Unsalted butter, softened (2 tablespoons): Provides richness and a pliable feel. For a dairy-free option, swap vegan butter (brands like Earth Balance work well).
- Peppermint extract (1/2 teaspoon): Use pure peppermint extract for a bright, classic mint flavor; adjust slightly if you prefer a subtler profile. Avoid mint oils that can be overly strong.
- Milk (1 tablespoon, plus more if needed): Whole milk gives the smoothest mouthfeel; almond or oat milk are excellent plant-based options that keep the mixture soft.
- Red and green gel food coloring: Gel colors are concentrated and won’t change the texture like liquid dyes do. Brands like AmeriColor or Wilton give vivid hues with a little product.
- Optional edible glitter or luster dust: Adds a festive sheen; dust lightly so it doesn’t affect texture.
Instructions
Combine the base: In a medium mixing bowl, stir together the sifted powdered sugar, light corn syrup, softened butter, peppermint extract, and 1 tablespoon of milk. Use a rubber spatula at first, then switch to your hands if needed. Aim for a smooth, pliable dough — like soft cookie dough — that holds together without sticking heavily to your fingers. If it feels tacky, add powdered sugar one tablespoon at a time until the texture improves. This step takes 5–8 minutes and benefits from warm hands to help the butter incorporate evenly. Divide and color: Split the dough into three equal portions. Keep one portion plain to provide contrast. Add a small dab of red gel to the second portion and a dab of green gel to the third. Knead each piece on a lightly sugared surface until color is uniform; gel colors need gentle pressure to disperse. If the dough softens too much while kneading, pop it into the fridge for 5 minutes to firm up. Form ropes and twist: Dust your work surface with powdered sugar to prevent sticking. Roll each colored portion into ropes about 1/2 inch thick using your palms. For a striped effect, place the three ropes side by side, gently press them together, then twist and roll to create a smooth, swirled rope. Keep your movements gentle to preserve the pattern. If you prefer single-color balls, skip the twisting and work with each color separately. Shape the candies: Cut the twisted rope into 1-inch pieces and roll each piece between your palms into a smooth ball. Place finished candies on a parchment-lined tray. If you want a flatter look, gently press each ball to a small disc. At this stage, sprinkle edible glitter or dust with luster dust for a festive finish — a little goes a long way. Chill to set: Transfer the tray into the refrigerator for about 30 minutes to firm the candies. Chilling helps them hold their shape and develop a slightly denser bite. After chilling, store in an airtight container with parchment layers between layers to prevent sticking. These keep well at cool room temperature for a short time but refrigerate for longer storage.
You Must Know
- High in sugar and treats: mostly powdered sugar — one batch yields about 24 bite-sized candies, each around 50 calories.
- Storage: refrigerate in an airtight container for up to 2 weeks or freeze for up to 3 months; separate layers with parchment to avoid sticking.
- Allergen note: contains dairy unless you use vegan butter and plant milk; check labels for corn or processing cross-contact if sensitive.
- Set time: refrigeration for 30 minutes ensures a firmer bite; you can also chill longer for a more solid feel.
My favorite part is watching someone take that first surprised bite — they expect a peppermint shell, then find a soft, almost cookie-like center. At a recent holiday brunch, these disappeared before the coffee was served, and a neighbor asked if I could double the batch next year. That kind of instant delight is why I keep this recipe in my holiday rotation.
Storage Tips
Keep the candies in an airtight container layered with parchment paper to prevent sticking. At cool room temperature they stay pleasant for a day or two, but refrigeration extends freshness to about two weeks. For longer storage, flash-freeze the tray with candies spaced apart for 30 minutes, then transfer to a freezer-safe bag for up to three months. Thaw in the refrigerator before serving to avoid condensation forming on the surface. Use shallow tins with tight lids for gifting — line with wax paper and pack gently to avoid crushing the shapes.
Ingredient Substitutions
If you need dairy-free options, replace the unsalted butter with an equal amount of solid vegan butter and use almond or oat milk instead of dairy. Swap the light corn syrup for mild honey or maple syrup, though honey will add a floral note and change the final sweetness slightly. If peppermint extract is too strong, reduce to 1/4 teaspoon or blend peppermint with 1/4 teaspoon vanilla extract for a softer finish. Use gel food color sparingly; liquid dye can affect consistency if overused.
Serving Suggestions
Arrange the candies on a small holiday platter with sprigs of fresh rosemary or holly for a festive presentation. They pair beautifully with strong coffee or peppermint tea. For parties, place them in small paper candy cups or clear cellophane bags tied with ribbon for gifting. For an elegant platter, alternate plain, red, and green balls or dust some with edible gold luster for contrast.
Cultural Background
Mint-flavored confections are rooted in many culinary traditions, often linked to winter holidays when bright flavors and festive colors lift the season. Soft mint centers take inspiration from fondant-style sweets and European butter candies but are adapted here into an American no-bake, pantry-friendly format. The red-and-green motif is a holiday classic in North America, while peppermint itself evokes both Victorian-era confectionery and modern candy-cane imagery.
Seasonal Adaptations
In summer, skip the chill time and shape chilled dough so candies aren’t too firm in warm kitchens. For winter gatherings, dip half of each ball in melted dark chocolate and immediately press crushed candy cane on top for a textured contrast. For St. Patrick’s Day, use green and white only and add a drop of crème de menthe flavoring if you like. Subtle cinnamon or orange zest can add warmth for Thanksgiving-era variations.
Meal Prep Tips
Make a double batch and portion into small airtight containers for hostess gifts or quick dessert fixes. Pre-measure powdered sugar into a bowl and have color gels ready for a streamlined assembly-line process. Store frozen batches in single-layer sheets separated by parchment so you can pull out exactly how many you need without thawing the whole batch. Label containers with the date for best-use guidance.
These soft peppermint balls are simple, adaptable, and delightfully festive — perfect for sharing, gifting, and keeping in the fridge for a quick minty pick-me-up. Give them a try with friends or family and make them your own with a personal finishing touch.
Pro Tips
If the dough becomes sticky while kneading, refrigerate for 5–10 minutes to firm up before continuing.
Use gel food coloring sparingly; a little goes a long way and avoids altering texture.
Sift the powdered sugar for a smooth, lump-free dough and more consistent mouthfeel.
To prevent sticking while rolling, dust your hands lightly with powdered sugar or use a silicone mat.
For gift-ready presentation, place candies in paper candy cups and layer in a tin with parchment.
This nourishing delicious no-bake soft peppermint balls recipe is sure to be a staple in your kitchen. Enjoy every moist, high protein slice — it is perfect for breakfast or as a wholesome snack any time.
Tags
Delicious No-Bake Soft Peppermint Balls
This Delicious No-Bake Soft Peppermint Balls recipe makes perfectly juicy, tender, and flavorful steak every time! Serve with potatoes and a side salad for an unforgettable dinner in under 30 minutes.
Instructions
Combine the base
In a medium bowl, mix sifted powdered sugar, light corn syrup, softened butter, peppermint extract, and 1 tablespoon milk. Stir with a rubber spatula, then knead with hands to form a smooth, pliable dough. Add powdered sugar 1 tablespoon at a time if too sticky.
Divide and color
Split dough into three equal portions. Leave one plain; add red gel to one portion and green gel to the other. Knead each until color is even. Refrigerate briefly if dough gets too soft.
Form ropes and twist
On a powdered-sugar-dusted surface, roll each portion into 1/2-inch ropes. For stripes, place ropes together, twist gently and roll to create a swirled rope. Keep motions gentle to preserve pattern.
Shape the candies
Cut the rope into 1-inch pieces and roll between palms into smooth balls. Place on parchment and dust with edible glitter or luster dust if using. For flatter shapes, gently press each ball.
Chill to set
Refrigerate the tray for about 30 minutes to firm the candies. After chilling, store in an airtight container with parchment layers to prevent sticking.
Last Step: Please leave a rating and comment letting us know how you liked this recipe! This helps our business to thrive and continue providing free, high-quality recipes for you.
Nutrition
Did You Make This?
Leave a comment & rating below or tag
@mrsrecipe on social media!
Categories:
You might also like...

Best Chicken Fried Steak
A crispy, tender chicken fried steak with a rich sausage cream gravy — classic comfort food perfect for family dinners and weekend indulgence.

Fluffy Japanese Soufflé Pancakes
Tall, cloudlike pancakes with a delicate eggy interior and golden exterior, perfect for a celebratory breakfast or a relaxed weekend treat.

Creamy Chicken Stuffed Peppers
Bell peppers filled with a rich, creamy chicken and cheese mixture—simple to assemble, family-friendly, and perfect for weeknight dinners or make-ahead meals.
Did You Make This?
Leave a comment & rating below or tag @mrsrecipe on social media!
Rate This Recipe
Share This Recipe
Enjoyed this recipe? Share it with friends and family, and don't forget to leave a review!
Comments (1)
This recipe looks amazing! Can't wait to try it.
Comments are stored locally in your browser. Server comments are displayed alongside your local comments.
Hi, I'm Clara!
What's Popular

Get My 30-Minute Meals email series!
Quick and easy dinner ideas delivered to your inbox.