>>
30-MINUTE MEALS! Get the email series now →


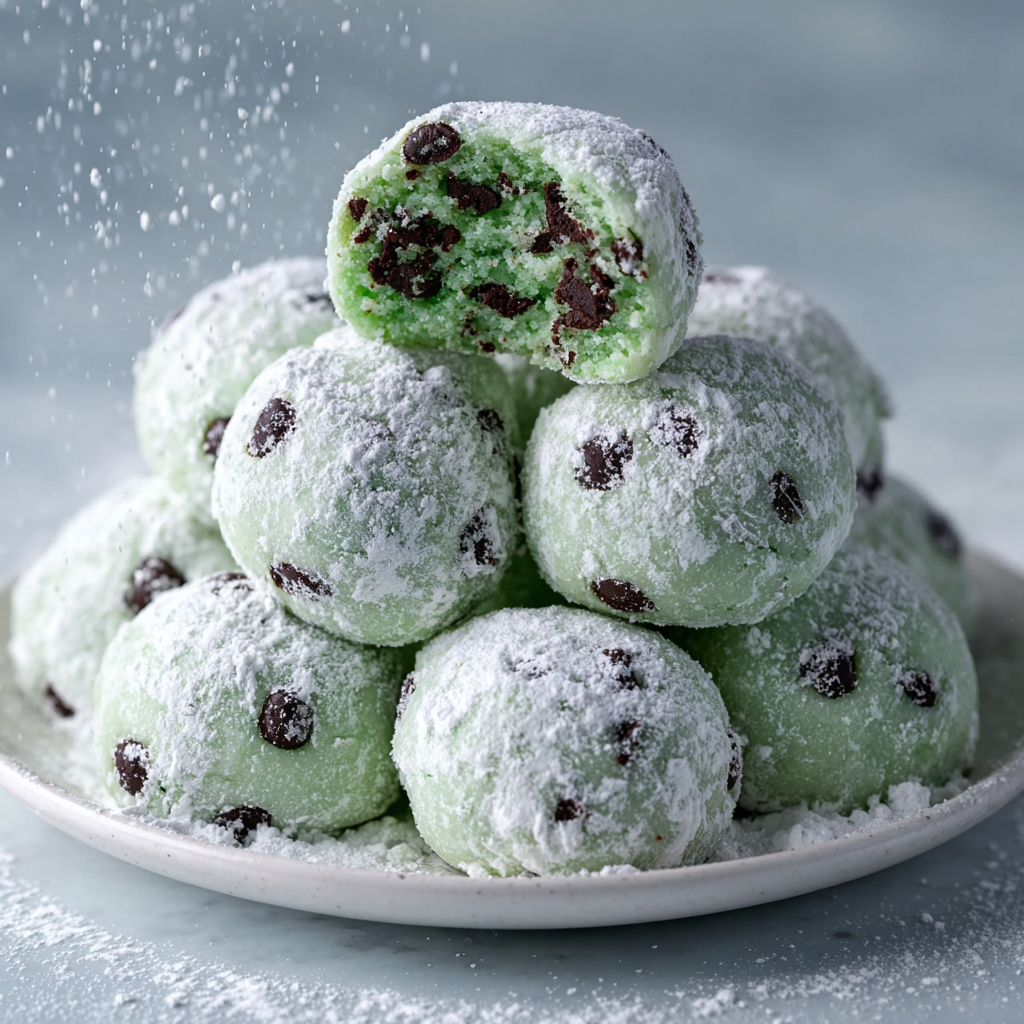
Buttery, mint-kissed cookies studded with mini chocolate chips and rolled in two coats of powdered sugar for a snowy, melt-in-your-mouth finish — perfect for holidays and cookie swaps.

This recipe arrived in my life during a frenzied December when I wanted something festive yet simple enough to make after work. These mint chocolate chip snowball cookies immediately became a favorite: the butter-forward base yields a delicate, crumbly texture that practically dissolves on the tongue, while the peppermint offers a bright, cool counterpoint to the rich mini chocolate chips. I first discovered the combination while tweaking a classic butter cookie recipe, swapping out part of the vanilla for peppermint and folding in tiny chocolate morsels. The result was better than I imagined — light, tender rounds covered in a soft, snowy shell of powdered sugar that brings both elegance and nostalgia to the plate.
What I love most about these cookies is how approachable they are. They require everyday pantry staples and one small chill period, but the payoff is tremendous: a batch that looks stunning on a holiday platter and tastes like a bakery specialty. My kids insist on helping with the rolling and coating, and I love watching them beam as they dust each cookie with the second helping of powdered sugar. Whether you gift them in tins or serve them warm with a cup of hot chocolate, they always disappear fast.
In my kitchen these cookies have become a holiday tradition. People ask for the recipe after every gathering, and I often double it for cookie swaps. Once I started using mini chips instead of large chunks, the texture improved even more because the chips distribute evenly without interrupting the delicate dough.

My favorite part of making these is the ritual of rolling and dusting. It turns a simple baking session into a memory-making activity; I often catch family members sneaking a cookie while we wait for the final dusting. The balance between cool peppermint and the soft chocolate makes each bite feel celebratory, and the delicate texture has won over even those who usually prefer dense cookies.
Store cooled cookies in an airtight container separated by parchment or wax paper to prevent sticking. At room temperature they remain fresh for up to 5 days; refrigeration can extend life by a few days but may soften the powdered sugar coating. For longer storage, freeze baked cookies in a single layer until firm, then transfer to a freezer-safe bag for up to 3 months. Thaw at room temperature and, if needed, roll lightly in a bit more powdered sugar to revive the snowy exterior.
If you need dairy-free options, swap the butter for a firm vegan stick butter measured cup-for-cup — keep in mind flavor will be slightly different. For gluten-free, use a 1-to-1 all-purpose gluten-free flour blend and allow the dough to rest chilled so the structure holds. If peppermint extract is too strong, reduce to 1/2 teaspoon and add a teaspoon of finely grated orange zest for a wintery twist. Dark chocolate mini chips deepen the chocolate flavor, while white chocolate chips create a sweeter, creamier contrast.
Serve the cookies on a festive platter dusted with extra powdered sugar or nested in holiday tins lined with tissue. They pair beautifully with hot cocoa, peppermint tea, or a mild coffee. Garnish with a small sprig of fresh mint or a few crushed peppermint candies for a textured, seasonal presentation. These cookies are also excellent alongside shortbread or gingerbread for a holiday cookie assortment.
Snowball-style cookies have roots in many baking traditions — often called Mexican wedding cookies, Russian tea cakes, or snowballs — typically made with butter, flour, and powdered sugar. This version adds peppermint and chocolate to give a seasonal, North American holiday twist. The name evokes the soft, rounded shape and the snowy sugar coating that has made these cookies a celebratory staple across cultures.
For winter holidays keep the peppermint; for Valentine’s Day substitute a few drops of red food coloring and use white chocolate chips with a dusting of pink sugar. In summer, omit peppermint and add lemon zest with a drizzle of simple lemon glaze after baking. For St. Patrick’s Day, use green gel coloring and add a pinch of matcha powder to the powdered sugar for a lightly earthy twist.
Make the dough up to 48 hours in advance and keep it refrigerated, or portion and freeze raw dough balls on a baking sheet before transferring them to a freezer bag for up to 3 months. Bake from frozen, adding a minute or two to the bake time. For cookie trays, bake the day before and store in airtight containers separated by parchment. Recoat with a fresh dusting of powdered sugar just before serving to restore that freshly made look.
These mint chocolate chip snowball cookies are simple, show-stopping, and endlessly adaptable. They invite sharing, gifting, and a little childhood nostalgia with each soft, snowy bite. I hope they become a favorite tradition in your household too.
Measure flour by spooning into the cup and leveling off to avoid dense cookies.
Use mini chocolate chips so the chips distribute evenly without disrupting the dough structure.
Chill the dough; it firms the butter and reduces spread during baking.
Roll cookies while slightly warm for the first sugar coat to allow the sugar to adhere to cracks and crevices.
Allow cookies to cool completely before the second coating so the sugar remains powdery rather than melting.
This nourishing easy melt-in-your-mouth mint chocolate chip snowball cookies recipe is sure to be a staple in your kitchen. Enjoy every moist, high protein slice — it is perfect for breakfast or as a wholesome snack any time.
If your dough feels too soft, chill it longer; cooler dough is easier to shape. If cookies spread too much, chill shaped dough balls 15 minutes on the baking sheet before baking.
Yes, the dough can be frozen shaped into balls on a sheet, then transferred to a freezer bag. Bake from frozen adding 1–3 minutes to the bake time.
This Easy Melt-in-Your-Mouth Mint Chocolate Chip Snowball Cookies recipe makes perfectly juicy, tender, and flavorful steak every time! Serve with potatoes and a side salad for an unforgettable dinner in under 30 minutes.
Preheat oven to 350°F and line baking sheets with parchment or silicone mats. Arrange racks to allow even airflow if baking multiple sheets.
Whisk together flour and salt in a medium bowl to aerate and evenly distribute the salt; set aside.
Beat softened butter on medium speed 1–2 minutes until light, then add granulated sugar and beat 2–3 minutes until pale and fluffy, scraping the bowl as needed.
Beat in vanilla and peppermint extracts until combined. Add a few drops of gel food coloring if desired and mix until uniform.
On low speed add the flour mixture in three additions, mixing only until combined after each to avoid overworking the dough.
Fold in mini chocolate chips with a spatula, cover the bowl, and chill the dough 30–60 minutes to firm the butter.
Scoop ~1 tablespoon portions and roll into 1-inch balls, place on sheets 1–1 1/2 inches apart, and bake 10–12 minutes until edges are lightly golden and centers set.
While warm, roll cookies in 1/2 cup powdered sugar. Cool completely (30–60 minutes), then roll in remaining powdered sugar for a thick snowy finish.
Last Step: Please leave a rating and comment letting us know how you liked this recipe! This helps our business to thrive and continue providing free, high-quality recipes for you.
Leave a comment & rating below or tag
@mrsrecipe on social media!

A crispy, tender chicken fried steak with a rich sausage cream gravy — classic comfort food perfect for family dinners and weekend indulgence.

Tall, cloudlike pancakes with a delicate eggy interior and golden exterior, perfect for a celebratory breakfast or a relaxed weekend treat.

Bell peppers filled with a rich, creamy chicken and cheese mixture—simple to assemble, family-friendly, and perfect for weeknight dinners or make-ahead meals.
Leave a comment & rating below or tag @mrsrecipe on social media!
Enjoyed this recipe? Share it with friends and family, and don't forget to leave a review!
This recipe looks amazing! Can't wait to try it.
Comments are stored locally in your browser. Server comments are displayed alongside your local comments.
Quick and easy dinner ideas delivered to your inbox.
