30-MINUTE MEALS! Get the email series now
MrsRecipe

Healthy Coconut Vanilla Protein Bars

5 from 1 vote
1 Comments
Clara Jennings
By: Clara JenningsUpdated: Apr 11, 2026
This post may contain affiliate links. Please read our disclosure policy.

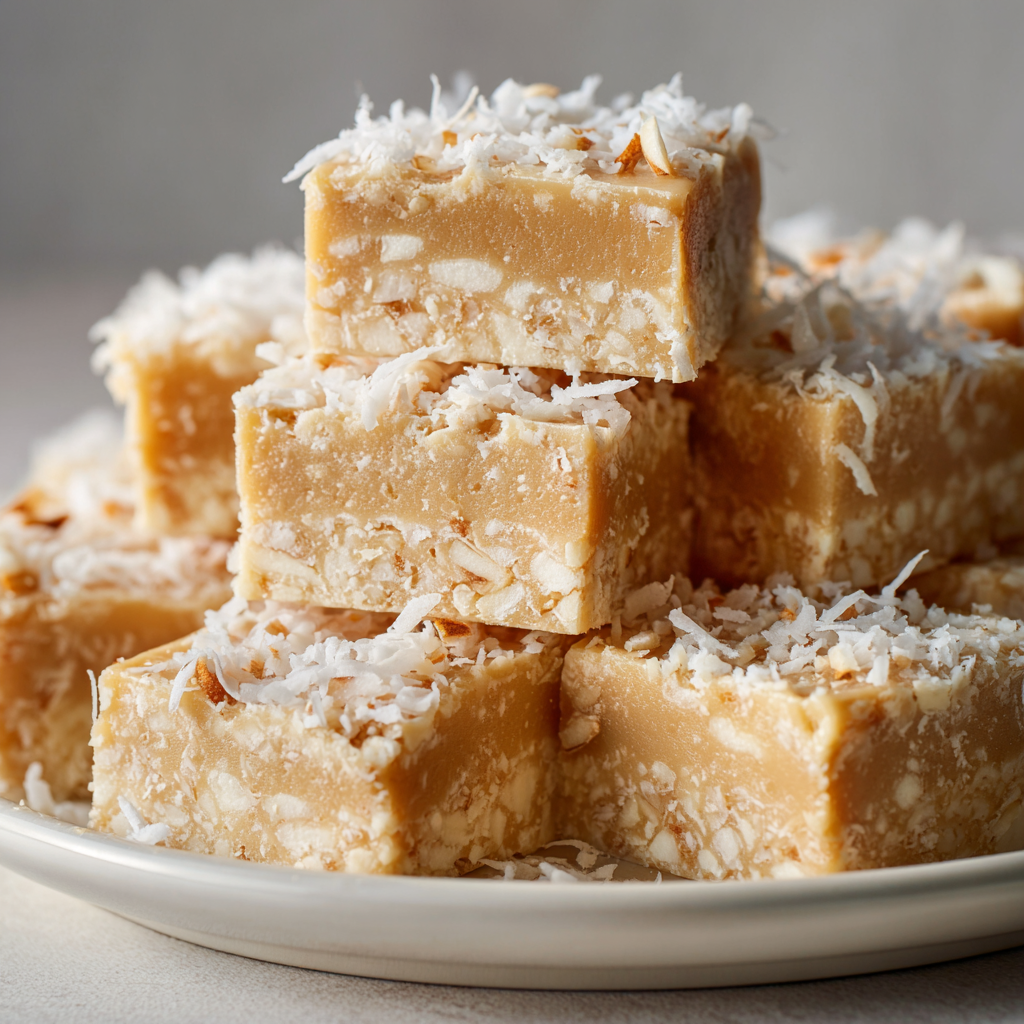
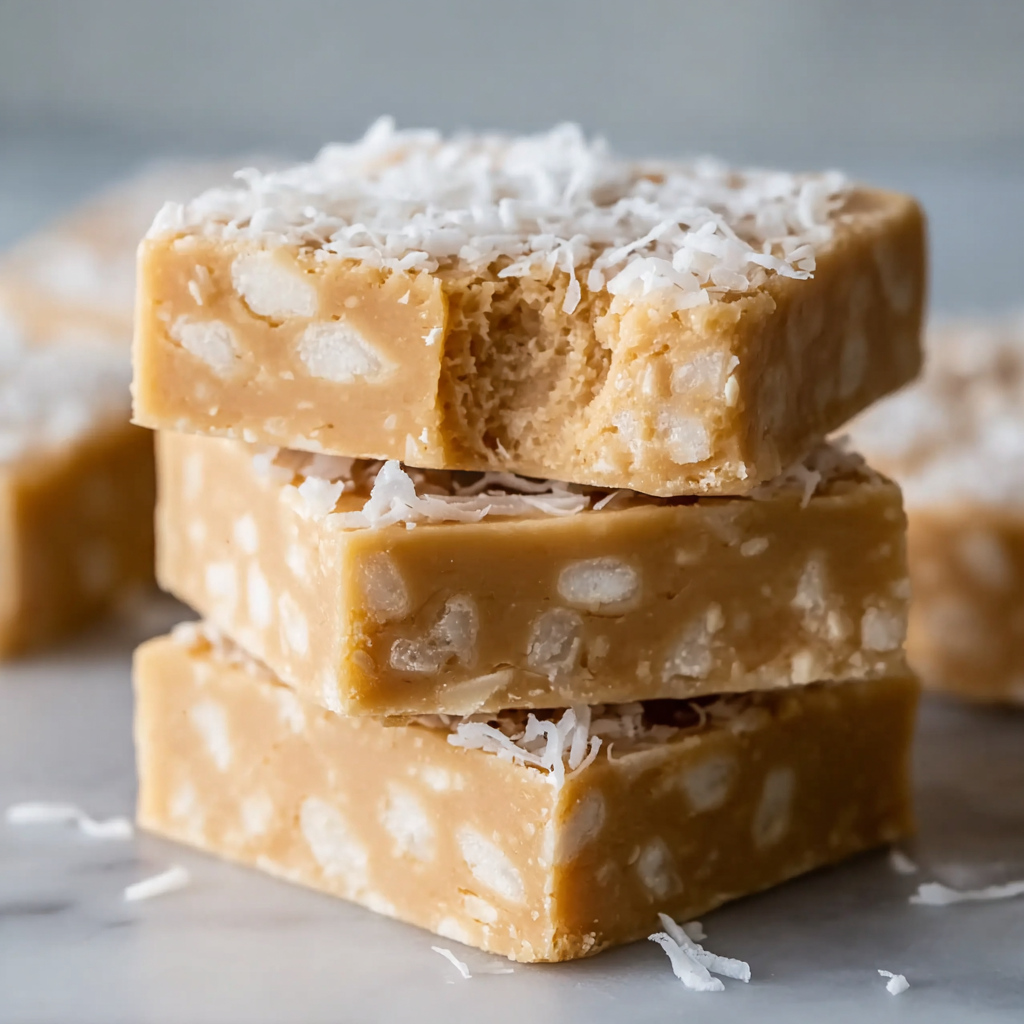
Easy no-bake coconut vanilla protein bars made with protein powder, nut butter, and shredded coconut—perfect for breakfast, snacks, or post-workout fuel.

Healthy Coconut Vanilla Protein Bars
This recipe has been a staple in my kitchen for busy mornings and sweaty afternoons when I want something that tastes indulgent but actually fuels me. I first developed this version on a Sunday afternoon when I had a jar of almond butter, an open bag of vanilla protein powder, and a craving for something coconut-forward. The texture—slightly chewy, pleasantly coconutty, with a creamy peanut-butter backbone—felt like a cross between a granola bar and a fudge square, and my partner declared them keepers after the first bite. They’re simple to assemble, require no baking, and are easy to adapt to whatever pantry staples you have on hand. What I love most is the balance: you get a hit of protein from the powder, healthy fats from the nut butter and coconut oil, and a touch of sweetness so they never feel like a diet snack. We often make a batch on Sunday and keep them in the fridge for grab-and-go breakfasts, after-school snacks, and travel-friendly energy bites. Kids love the coconut texture and the optional white chocolate drizzle makes them feel like a treat without undoing the whole point: clean, straightforward ingredients that keep you satisfied.

Why You'll Love This Recipe

  • Ready in about 15 minutes plus chilling time—assemble quickly and let the fridge do the rest, ideal for hectic mornings or meal-prep Sundays.
  • Uses pantry staples: protein powder, nut butter, coconut oil, shredded coconut, and a natural sweetener—no obscure ingredients required.
  • Customizable: swap peanut butter for almond butter, honey for maple syrup, or use plant-based protein to suit dietary needs.
  • No baking required, which saves time and keeps the kitchen cool in warm months; bars set in the fridge or freezer and hold their shape well.
  • Portable and freezer-friendly—freeze for up to 3 months and thaw individual bars as needed for a fast snack or post-workout fuel.
  • High in protein and healthy fats, low in processing when you choose minimally processed ingredients for sustained energy.

In our household these bars became the backbone of weekend meal prep—my daughter asked to add them to her lunchbox rotation, and I started leaving a small stack next to my gym bag. Little adjustments I made over time—adding a touch of coconut flour for firmer bars, tweaking the sweetness with maple syrup—made them perfect for our tastes without complicating the process.

Ingredients

  • Vanilla protein powder (1 cup): I use a plant-based vanilla powder for a cleaner label, but whey works fine if you prefer higher biological value protein. Look for a powder with minimal added sugar—brands like Garden of Life or Orgain are reliable choices; the powder contributes bulk and protein while giving that classic vanilla aroma.
  • Nut butter (1/2 cup): Choose creamy peanut butter or almond butter (unsweetened). Natural nut butters with only nuts and a pinch of salt provide the best flavor and texture—Justin’s and MaraNatha are good supermarket options. The fat in the nut butter helps bind the bars and gives a rich mouthfeel.
  • Honey or maple syrup (1/4 cup): These liquid sweeteners add stickiness and sweetness; maple is vegan-friendly, while honey lends a floral depth. Use pure maple syrup if you need a vegan version.
  • Melted coconut oil (1/4 cup): Solid at room temperature but liquid when warmed, coconut oil firms the bars when chilled and adds subtle coconut flavor—use refined if you want a neutral profile.
  • Vanilla extract (1 tsp): A small splash of pure vanilla amplifies the vanilla-protein notes and rounds the flavor.
  • Unsweetened shredded or flaked coconut (1 cup): Provides chew and coconut flavor; toasted lightly before use will deepen the nutty notes if you prefer.
  • Sea salt (pinch): A pinch brightens all the flavors—don’t skip it.
  • Optional - Coconut flour (1–2 tbsp): Add if the mixture feels loose; it absorbs moisture and firms bars without changing flavor.
  • Optional topping: Extra shredded coconut or a drizzle of melted white chocolate for a dessert-like finish.

Instructions

Line the pan: Line an 8x8-inch square baking dish with parchment paper, leaving a 1–2-inch overhang on two sides to lift the set bars out easily. Press the parchment into the corners so the mixture will reach all edges and you can get clean slices later. Mix the wet ingredients: In a medium bowl, whisk together 1/2 cup nut butter, 1/4 cup honey or maple syrup, 1/4 cup melted coconut oil, and 1 teaspoon vanilla extract until smooth and glossy. Warm the nut butter slightly if it’s too stiff—about 10 seconds in the microwave—so everything blends without overworking. Add the dry ingredients: Stir in 1 cup vanilla protein powder, 1 cup unsweetened shredded coconut, and a pinch of sea salt. Mix with a spatula until evenly combined—if the mixture is too loose or sticky to shape, sprinkle in 1–2 tablespoons coconut flour, one tablespoon at a time, until it holds together when pressed. Press and shape: Transfer the mixture into the prepared pan, using the back of a spoon or an offset spatula to press it evenly into all corners. Aim for a uniform thickness (about 1/2 to 3/4 inch) so bars set consistently. Smooth the top and press down firmly to compact the mixture. Chill to set: Refrigerate for 1–2 hours until firm. For a faster set, freeze for about 30 minutes—freeze if you want clean, very firm bites. Visual cue: the surface should look matte and hold an indentation without slumping. Slice and serve: Use the parchment overhang to lift the slab from the pan. Cut into 10–12 bars with a sharp knife—wipe the blade between cuts for cleaner edges. If desired, top with extra shredded coconut or a drizzle of melted white chocolate; allow drizzle to set in the fridge before packing. User provided content image 1

You Must Know

  • These bars freeze exceptionally well—wrap individually in parchment and store in a sealed container for up to 3 months; thaw in the fridge or at room temperature for 20–30 minutes.
  • Protein powders vary in sweetness and absorption: plant-based powders often need a touch more liquid or coconut flour, while whey can make the mixture denser and slightly moister.
  • If you need firmer bars for travel, increase coconut flour by 1 tablespoon increments until you reach the desired texture; avoid more than 2 tablespoons or they can taste dry.
  • Nutrition-wise, these are high in protein and healthy fats but also calorie-dense—portion control is helpful if you’re tracking intake.

My favorite thing about these bars is how customizable they are—one week I made them with a scoop of collagen alongside vanilla plant powder for extra joint support, another time I toasted the coconut and added a pinch of cinnamon for warmth. Family and friends often ask for variations, and surprising little swaps often become new favorites.

Storage Tips

Store finished bars in an airtight container in the fridge for up to 10 days; use parchment or wax paper between layers to prevent sticking. For longer storage, wrap individually and freeze up to 3 months—defrost in the fridge overnight or at room temperature for 20–30 minutes before eating. Avoid leaving bars at room temperature for extended periods in hot climates, as the coconut oil can soften and alter the texture. When reheating gently, place a bar in a warm oven (150°C / 300°F) for a few minutes to soften, or microwave for 8–10 seconds if desired.

Ingredient Substitutions

Swap nut butter freely: sunflower seed butter works well for nut allergies and mimics the same creamy bind. Use maple syrup instead of honey to keep the recipe vegan; however, you may need an extra tablespoon because maple can be slightly less viscous. If coconut is an issue, swap shredded coconut for finely chopped oats—oats absorb moisture differently, so reduce coconut flour if you use oats. For a lower-sugar option, choose a low-sugar protein powder and reduce syrup by 1–2 tablespoons, adding a splash of unsweetened applesauce if the mixture becomes too dry.

User provided content image 2

Serving Suggestions

Serve bars slightly chilled alongside a cup of coffee or a smoothie for breakfast, or pair with Greek yogurt and fresh berries for a higher-protein snack. For an afternoon pick-me-up, cut into smaller squares and arrange on a platter with fresh fruit, nuts, and dark chocolate pieces. Garnish with toasted coconut flakes, a light dusting of cinnamon, or a thin drizzle of melted white chocolate for a dessert-style presentation that still packs protein.

Cultural Background

While these bars are not rooted in a single traditional cuisine, they draw on modern health-food trends that blend coconut-forward flavors with convenience. Coconut has long been used across tropical cuisines for its oil and shredded flesh; pairing it with nut butters and protein powder is a contemporary adaptation driven by nutritional needs and on-the-go lifestyles. This combination reflects a fusion of pantry-first home cooking and functional nutrition popularized in Western health circles.

Seasonal Adaptations

In summer, freeze bars for a cool, firm texture and add lemon zest for brightness. Fall and winter benefit from warming spices—cinnamon, nutmeg, or a pinch of cardamom complement the coconut and vanilla beautifully. For holiday gifts, press the slab into a decorative tin, drizzle with white chocolate or dark chocolate, and wrap in parchment with a ribbon—small adjustments transform them from everyday snacks into thoughtful homemade presents.

Meal Prep Tips

Make a double batch and store half in the freezer for future weeks; portion bars into single-serve packs for lunchboxes or gym bags. Use an 8x8 pan to ensure uniform thickness—if you prefer thicker bars, use a smaller pan and shorten cutting into fewer pieces. Label containers with the date and intended use (breakfast, post-workout) to rotate stock. Keep a small cutting board and sharp chef’s knife in the fridge for cleaner slices when the bars are cold.

These bars are a simple, reliable building block for healthier snacks—easy to personalize, quick to prepare, and satisfying to share. Try a batch this weekend and tweak one element to make them uniquely yours; I promise they’ll disappear fast.

Pro Tips

  • Warm the nut butter slightly to make mixing easier and achieve a smoother texture.

  • Press the mixture firmly into the pan to avoid crumbly edges when cutting.

  • Wipe the knife clean between cuts to get neat, even bars.

  • Toast shredded coconut lightly in a dry skillet for 3–5 minutes to deepen flavor before mixing.

This nourishing healthy coconut vanilla protein bars recipe is sure to be a staple in your kitchen. Enjoy every moist, high protein slice — it is perfect for breakfast or as a wholesome snack any time.

FAQs about Recipes

Can I make these vegan?

Yes—use maple syrup instead of honey and a plant-based protein powder to make the bars fully vegan.

How long do the bars keep in the freezer?

Freeze for up to 3 months in an airtight container. Thaw in the fridge or at room temperature for 20–30 minutes before eating.

What if the mixture is too sticky?

Add 1–2 tablespoons of coconut flour, one tablespoon at a time, until the mixture is firm enough to hold shape.

Tags

Fresh & HealthyHealthy SnackProtein BarsCoconutVanillaRecipesFood
No ratings yet

Healthy Coconut Vanilla Protein Bars

This Healthy Coconut Vanilla Protein Bars recipe makes perfectly juicy, tender, and flavorful steak every time! Serve with potatoes and a side salad for an unforgettable dinner in under 30 minutes.

Servings: 10 steaks
Healthy Coconut Vanilla Protein Bars
Prep:15 minutes
Cook:1 hour
Rest Time:10 mins
Total:1 hour 15 minutes

Ingredients

Main

Optional

Instructions

1

Line the pan

Line an 8x8-inch square baking dish with parchment paper leaving a 1–2 inch overhang to lift bars out easily.

2

Mix the wet ingredients

Combine 1/2 cup nut butter, 1/4 cup honey or maple syrup, 1/4 cup melted coconut oil, and 1 teaspoon vanilla extract in a bowl; whisk until smooth.

3

Add the dry ingredients

Stir in 1 cup vanilla protein powder, 1 cup shredded coconut, and a pinch of sea salt. If too sticky add 1–2 tablespoons coconut flour until it holds together.

4

Press and shape

Transfer mixture to the prepared pan and press evenly into corners using a spatula or the back of a spoon for a compact slab.

5

Chill to set

Refrigerate for 1–2 hours or freeze for 30 minutes until firm. The surface should be matte and hold an indentation when pressed.

6

Slice and serve

Lift the slab using the parchment overhang and cut into 10–12 bars. Top with extra shredded coconut or melted white chocolate if desired.

Last Step: Please leave a rating and comment letting us know how you liked this recipe! This helps our business to thrive and continue providing free, high-quality recipes for you.

Nutrition

Calories: 220kcal | Carbohydrates: 15g | Protein:
12g | Fat: 13g | Saturated Fat: 4g |
Polyunsaturated Fat: 3g | Monounsaturated Fat:
5g | Trans Fat: 1g | Cholesterol: 253mg | Sodium:
0mg | Potassium: 953mg | Fiber: 0g | Sugar:
0g | Vitamin A: 577IU | Vitamin C: 3mg | Calcium:
47mg | Iron: 6mg

Did You Make This?

Leave a comment & rating below or tag
@mrsrecipe on social media!

Healthy Coconut Vanilla Protein Bars

Categories:

Healthy Coconut Vanilla Protein Bars

Did You Make This?

Leave a comment & rating below or tag @mrsrecipe on social media!

Rate This Recipe

Share This Recipe

Enjoyed this recipe? Share it with friends and family, and don't forget to leave a review!

Comments (1)

Leave a Comment

0/1000 characters
Food Lover
1 day ago

This recipe looks amazing! Can't wait to try it.

Rating:

Comments are stored locally in your browser. Server comments are displayed alongside your local comments.

Family Photo

Hi, I'm Clara!

Chef and recipe creator specializing in delicious Fresh & Healthy cooking. Passionate about sharing easy-to-follow recipes that bring families together around the dinner table.

Get My 30-Minute Meals email series!

Quick and easy dinner ideas delivered to your inbox.